Forum Manual (or how to make your posts pretty)
Posted: Wed Dec 28, 2011 4:07 pm
1. Bold, Italic, Underline, Strikethough, Font Colour
2. Spoiler
3. Links
4. Images
5. Youtube Links
6. Quotes
7. Anchors
8. Lists
9. Code
Important final notes:
The preview button is your friend.
Whenever you are unsure if you got things right use it to check your post before submitting it. That applies specifically when you're making huge more complex posts like the one you see in front of you.
You can look at how others used tags to structure their post.
Simply click at the quote button and you'll see the entire code in front of you.
Make sure that everyone can understand you.
The nicest looking post isn't worth anything if you don't use proper wording, grammar, punctuation and format. Of course nobody here will lynch you just because English isn't your native language and you've made a mistake. Deliberately trying to make reading/understanding your post difficult (e.g. with leetspeak, wall of text etc.) however is unpolite, will stop people from reading your post and can earn you a ban.
Spoiler
Show
Pretty simple, there's two ways to do this(these are used in all other tags too):
a) Mark the text you want to change, then click the according button.
b) Click the button of your choice, then type or copy in the text you want to change.
Note: - All of these can be combined in anyway you like. Be careful to not overuse them though since that could annoy others.
What it should look like:
While typing: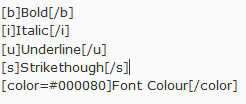 Result:
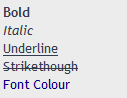
a) Mark the text you want to change, then click the according button.
b) Click the button of your choice, then type or copy in the text you want to change.
Note: - All of these can be combined in anyway you like. Be careful to not overuse them though since that could annoy others.
What it should look like:
While typing:
Result:Spoiler
Show
Same as above really in regards to making them.
Optionally you can change the heading of your spoiler (see images below).
Notes:
- When posting pictures/videos (especially large ones or lots of them) it is generally advisable to put them in spoilers to make things easier for people with slow internet connections. It's also easier to overlook your post and with that read and understand it.
- You can't have spoilers within spoilers.
- Don't use spoilers where it's unnecessary. People don't like clicking around for nothing.
What it should look like:
While typing: Result:
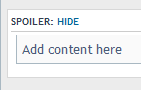
What it should look like(with spoiler title):
While typing: Result:
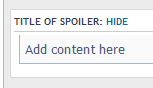
Optionally you can change the heading of your spoiler (see images below).
Notes:
- When posting pictures/videos (especially large ones or lots of them) it is generally advisable to put them in spoilers to make things easier for people with slow internet connections. It's also easier to overlook your post and with that read and understand it.
- You can't have spoilers within spoilers.
- Don't use spoilers where it's unnecessary. People don't like clicking around for nothing.
What it should look like:
While typing:
Result:What it should look like(with spoiler title):
While typing:
Result:Spoiler
Show
First method displays the URL in blue font, people can click on that to get to the site you've linked.
The second method displays a text of your choice, clicking on that leads people to the site you've linked.
Notes:
- There are rules on what you can link to and what is forbidden. You should have seen those when creating your account. (If someone has the link I'd like to put it here).
- Sure you can also link images and videos this way but it's faster for others if you use the appropriate methods for those (cp. 4./ 5.).
What it should look like (first method):
While typing: Result:
What it should look like (second method):
While typing: Result:
The second method displays a text of your choice, clicking on that leads people to the site you've linked.
Notes:
- There are rules on what you can link to and what is forbidden. You should have seen those when creating your account. (If someone has the link I'd like to put it here).
- Sure you can also link images and videos this way but it's faster for others if you use the appropriate methods for those (cp. 4./ 5.).
What it should look like (first method):
While typing:
Result:What it should look like (second method):
While typing:
Result:Spoiler
Show
Using this tag you can link to any image on the internet be it one uploaded by yourself or someone else.
Notes:
- Rules for links apply obviously
- Be careful about linking pictures with high resolution. Even with spoiler tags every image in a thread will be loaded, making the life of people with slow connections difficult. Also keep in mind some users will be using smaller resolutions than you. Your 3000x2000 picture means lots of scrolling sideways for them and they might not be able to see what you want them too.
- When posting pictures (especially large ones or lots of them) it is generally advisable to put them in spoilers to make things easier for people with slow internet connections. It's also easier to overlook your post and with that, read and understand it.
Step 1 (optional)
Upload your image to one of the image hosters listed below.
Photobucket
Imgur
Imageshack
Uppix
Dropbox
CPC (French)
Step 2
Obtain the URL of your picture (on "regular" webpages you can do that via right-click)
Example (Photobucket):
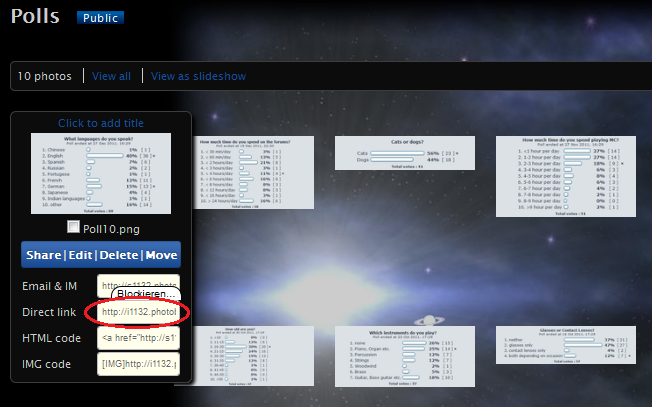
What it should look like:
While typing: Result:
Notes:
- Rules for links apply obviously
- Be careful about linking pictures with high resolution. Even with spoiler tags every image in a thread will be loaded, making the life of people with slow connections difficult. Also keep in mind some users will be using smaller resolutions than you. Your 3000x2000 picture means lots of scrolling sideways for them and they might not be able to see what you want them too.
- When posting pictures (especially large ones or lots of them) it is generally advisable to put them in spoilers to make things easier for people with slow internet connections. It's also easier to overlook your post and with that, read and understand it.
Step 1 (optional)
Upload your image to one of the image hosters listed below.
Photobucket
Imgur
Imageshack
Uppix
Dropbox
CPC (French)
Step 2
Obtain the URL of your picture (on "regular" webpages you can do that via right-click)
Example (Photobucket):
What it should look like:
While typing:
Result:Spoiler
Show
Step 1:
You need the ID of your video.
Where to find it (it's the part circled red):


Notes:
- Rules for links apply obviously
- When posting pictures/videos (especially large ones or lots of them) it is generally advisable to put them in spoilers to make things easier for people with slow internet connections. It's also easier to overlook your post and with that read and understand it.
- Just so you know: Some people might not be able to view your videos if they have music with certain copyright on them.
What it should look like (Step 2):
While typing: Result:
You need the ID of your video.
Where to find it (it's the part circled red):
Notes:
- Rules for links apply obviously
- When posting pictures/videos (especially large ones or lots of them) it is generally advisable to put them in spoilers to make things easier for people with slow internet connections. It's also easier to overlook your post and with that read and understand it.
- Just so you know: Some people might not be able to view your videos if they have music with certain copyright on them.
What it should look like (Step 2):
While typing:
Result:Spoiler
Show
This time there are three ways to get this tag working in your post:
a) Type it yourself as is shown below (usually only done when quoting off-site sources)
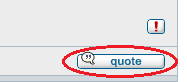
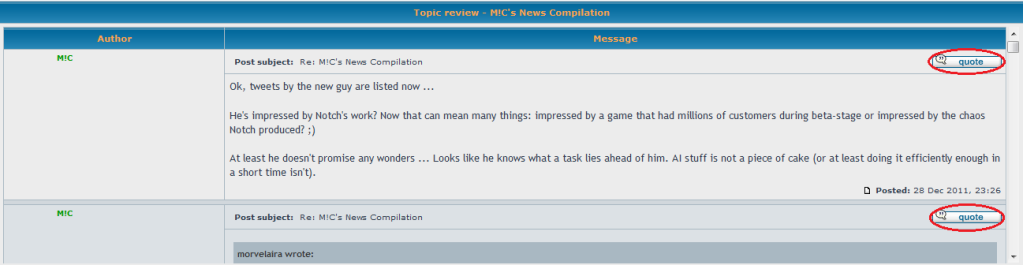
b) Use the button in the bottom-right corner of the post you want to quote:
c) Use the list at the bottom of the reply-window (especially useful when quoting multiple posts):
Notes:
- If you are answering/replying/referring to any posts made before yours always use the quote tag so that people don't have to guess what you are talking about and don't have to scroll around needlessly to find your context.
- Try to avoid stacking too many quotes (2 or 3 is no problem much more is). It doesn't look nice, occupies lots of screen-space and makes your post look cluttered.
- Especially when quoting long posts it is advisable to reduce the quote to those passages you are reffering to and leave out the rest.
What it should look like:
While typing: Result:
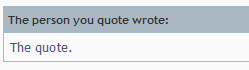
a) Type it yourself as is shown below (usually only done when quoting off-site sources)
b) Use the button in the bottom-right corner of the post you want to quote:
c) Use the list at the bottom of the reply-window (especially useful when quoting multiple posts):
Notes:
- If you are answering/replying/referring to any posts made before yours always use the quote tag so that people don't have to guess what you are talking about and don't have to scroll around needlessly to find your context.
- Try to avoid stacking too many quotes (2 or 3 is no problem much more is). It doesn't look nice, occupies lots of screen-space and makes your post look cluttered.
- Especially when quoting long posts it is advisable to reduce the quote to those passages you are reffering to and leave out the rest.
What it should look like:
While typing:
Result:7. Anchors
Spoiler
Show
Use these for XXL posts. With this you can have links to anchors you placed somewhere in your posts (or on the same page in another post). This will reduce the amount of scrolling people have to do. Best (and biggest) example is Battosay's video corner.
What it should look like (the link part):
While typing: Result:
What it should look like (the anchor part):
While typing: Result:
Can't make sense of this? Further down in this topic you can find another example by Battosay.
Thanks for your help Battosay!
What it should look like (the link part):
While typing:
Result:What it should look like (the anchor part):
While typing:
Result:Can't make sense of this? Further down in this topic you can find another example by Battosay.
Thanks for your help Battosay!
Spoiler
Show
This tag is used to create ... yes, you're right, lists.
What it should look like:
While typing: Result:
What it should look like (with different symbols):
While typing: Result:
Note: Instead of "1" you can also use "a", "A", "i", "I" which will result in "a., b., c., ...", A., B., C., ...", "i., ii., iii., ...", "I., II., III., ... .
Thanks for your help sargunster!
What it should look like:
While typing:
Result:What it should look like (with different symbols):
While typing:
Result:Note: Instead of "1" you can also use "a", "A", "i", "I" which will result in "a., b., c., ...", A., B., C., ...", "i., ii., iii., ...", "I., II., III., ... .
Thanks for your help sargunster!
Spoiler
Show
Anything within code tags will use a fixed width font and will not be parsed as bbcode. You can use it whenever you want people to see your code and not the result of it. (Yes it would have been perfect for this manual but I didn't know it at first and then wanted to keep the results next to the code not below it.)
What it looks like:
While typing: Result:
Thanks for your help sargunster!
What it looks like:
While typing:
Result:Thanks for your help sargunster!
The preview button is your friend.
Whenever you are unsure if you got things right use it to check your post before submitting it. That applies specifically when you're making huge more complex posts like the one you see in front of you.
You can look at how others used tags to structure their post.
Simply click at the quote button and you'll see the entire code in front of you.
Make sure that everyone can understand you.
The nicest looking post isn't worth anything if you don't use proper wording, grammar, punctuation and format. Of course nobody here will lynch you just because English isn't your native language and you've made a mistake. Deliberately trying to make reading/understanding your post difficult (e.g. with leetspeak, wall of text etc.) however is unpolite, will stop people from reading your post and can earn you a ban.